
Overview
In today’s fast-paced digital era, it is very important for an application to handle the increased workload without impacting its performance. Implementing caching mechanisms can significantly improve the performance and scalability of our application, and when we combine the capabilities of Spring Boot and Redis, the outcomes can be truly extraordinary. In this blog post, we check out the integration of caching into your Spring Boot application. Now, let me show you how to improve the performance and scalability of your Spring Boot applications using Redis.
Understanding Caching in Spring Boot
Caching is like storing your most-used stuff in an easy-to-reach spot called cache, so the next time you need it, it loads faster. So you don’t have to wait for the data to load from the original source every time you want to access it. The data is ready for you right away! The main idea is to avoid fetching data from its source as much as possible. This approach can help us make our app more efficient and scalable.
With Spring Boot’s caching abstraction layer, you can easily hook up with various caching providers like Redis, Ehcache, Hazelcast, and Memcached. It’s super convenient! Developers can pick the best caching solution for their application’s needs. There are loads of other options out there that can work for different needs and scale requirements. If you want to use caching in Spring Boot, you should know how to work with external caching frameworks, set up caching annotations, and adjust cache eviction policies to your needs. Developers can make their apps faster by using caching. This makes the app more responsive and enjoyable for users. Modern Spring Boot application development relies on caching, whether it’s with Redis or other external frameworks. Caching allows developers to easily build high-performance systems.
Understanding Redis
Redis is basically a multi-purpose tool that can work as a database, cache, message broker, and even a streaming engine. It is really good at handling data structures like strings, hashes, lists, sets, and sorted sets. It’s super fast and efficient! One of the coolest things about Redis is that it can persist your data by either dumping the dataset to disk periodically or appending each command to a disk-based log. That’s why it is a perfect match for the application that requires scalability and high availability.
When an application using Redis caching receives a request for data, it first checks the Redis cache. If you’ve recently accessed the data, it can be fetched quickly from the cache. This would help us save time and effort by not having to fetch it from its data storage every time. By doing this, our app will work way faster and won’t keep us waiting for ages, especially when we’re dealing with large datasets. If we can’t find the data we’re requesting in the cache, we’ll just fetch it from the database. While doing this, it will also save a copy of the data in the Redis Cache with a unique key.

So, that’s it; now we can fetch the data straight from the cache when we need to access it again. Redis caching helps our app run faster and scale better by using super-fast in-memory storage. This means our app becomes more responsive and scalable overall.
Setting Up Redis with Spring Boot
Add Redis Dependency
If we want to use Redis for caching in our Spring Boot app, we need to add the necessary dependencies first. We also need to make sure that we have the spring-boot-starter-data-redis dependency. This dependency ensures that we have all the components and configurations to smoothly integrate Redis into our project.
implementation ("org.springframework.boot:spring-boot-starter-data-redis")Configure Application Properties
Now that we have added Redis dependency, it’s time to set up Redis properties and implement caching in our Spring Boot application.
spring.data.redis.host=localhost
spring.data.redis.port=6379
spring.cache.redis.time-to-live=3600
If we want to connect to a Redis server, we should specify the details of the host and port where the server is up and running. Additionally, we can change how long cache entries live in the system by adjusting the spring.cache.redis.time-to-live property. In our example, we have set our TTL to 3600 seconds (60 minutes). This means that cached entries will expire and be removed from the cache after this time period.
Enable Caching in Spring Boot
If we use the @Cacheable annotation in our configuration class, Spring Boot will take care of setting up caching for our app automatically. This annotation helps create proxies for Spring beans that implement caching behaviour. It also helps to check if the result of a method has already been cached.
@Configuration
@EnableCaching
public class CachingConfig {

   @Value("${spring.cache.redis.time-to-live}")
   private Duration timeToLive;

   @Bean
   public RedisConnectionFactory redisConnectionFactory() {
       return new LettuceConnectionFactory();
   }

   @Bean
   public CacheManager cacheManager(RedisConnectionFactory connectionFactory) {
       RedisCacheConfiguration cacheConfiguration = RedisCacheConfiguration
                          .defaultCacheConfig()
                          .entryTtl(timeToLive);

       return RedisCacheManager
                     .builder(connectionFactory)
                     .cacheDefaults(cacheConfiguration)
                     .build();
   }
}
If you want to use caching annotations like @Cacheable, @CachePut, or @CacheEvict, you need to add the @EnableCaching annotation as well. Spring won’t be able to recognize them otherwise.
Serializing the Object
Redis is a type of a database that works in memory. We need to transform our objects into a sequence of bytes before saving them in Redis, and do the opposite when we want to get the data back. This approach is called serialization.
@Getter
@Setter
@Entity
public class Book implements Serializable {

   @Id
   @GeneratedValue(strategy = GenerationType.IDENTITY)
   private Long id;

   @NonNull
   @Column(nullable = false)
   private String title;

   @NonNull
   @Column(nullable = false)
   private String author;
}
Serializing an object helps Redis to store and retrieve the objects succesfully. If an object is non-serializable, Redis (or any other serialization-based system) won’t be able to handle it.
Use Caching Annotations in the Controller Layer
Cacheable
When we use the Cacheable annotation in Spring, it helps us to cache the result of a method. So, basically, we can store the result based on a specified cache name, which, in this particular scenario, is "allBooks".
@GetMapping("/books")
@Cacheable(value = "allBooks")
public List<Book> getAllBooks()
The first time we call getAllBooks(), it will execute bookRepository.findAll() and save the output in Redis cache. So, if we call the getAllBooks() method again, we don’t have to hit the database every time. Instead, we can just use the cached result. That way, we can speed things up and avoid repeatedly querying the database for the same data.
CachePut
When we use the @CachePut annotation for updateBook() method, it automatically updates the cached entry with the newly updated book after it’s saved in the database.
@PutMapping("/updateBook/{id}")
@CachePut(value = "book", key = "#id")
public Book updateBook(@PathVariable Long id, @RequestBody Book updatedBook)
CacheEvict
We can use the @CacheEvict annotation in the deleteBook() method to clear the cache entry of the deleted book ID once it’s removed from the database.
@DeleteMapping("/deleteBook/{id}")
@CacheEvict(value = "book", key = "#id")
public void deleteBook(@PathVariable Long id)
This annotation helps us get rid of the cached entry linked to the specified cache name "book" and cache key "#id". When we delete a book from the database, we also remove the cached entry related to its ID. So once it’s deleted, it’s gone for good!
Monitoring and Performance Tuning
In this section, we’ll check out how Redis caching boosts up the performance in Spring Boot. There are two compelling screenshots that clearly show the difference.
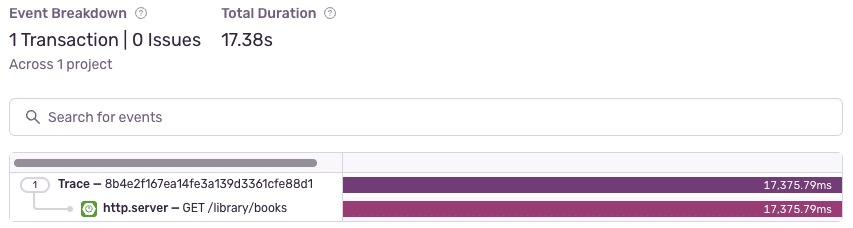
During our initial performance check, we found out that it took a 17 seconds to fetch all the books from the library endpoint.
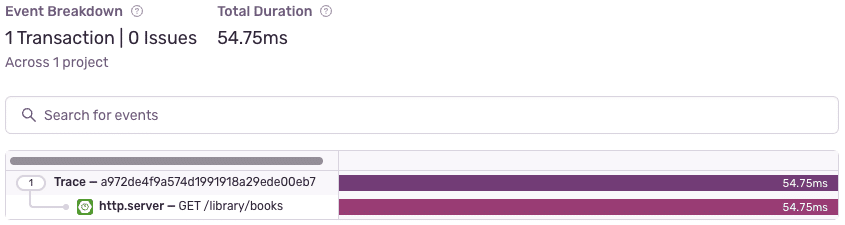
Once we cached the books in Redis, the response times improved amazingly to just 54 milliseconds. These screenshots prove how caching can make the system work better by making operations faster, smoother, and more scalable.
Conclusion
To sum it up, using Redis for caching with Spring Boot can make a huge difference in how fast and scalable your projects can be. When we combine Redis’ super-fast in-memory data store with Spring Boot’s seamless integration, we can reduce response times and make our app even faster. In the monitoring and performance tuning section, we found out that caching data that we use a lot can help us reduce the load on our backend resources. Redis rocks as a caching solution! It helps us build apps that are super-fast and can handle a big data sets without any hiccups.
If you would like to find out more about my, Mert Yuecel’s, projects, please visit my GitHub profile or connect with me on LinkedIn – I look forward to the exchange!